WestProjects
Here I will make a page on projects I did, most off them with a bit off help, so credits to whom desirve them!!
- Korg Nano Kontrol MIDI mapper
- Enttec USB Pro DMX support.
- Sending and Recieving Text over Artnet
- Using A Kramer VP-8x8 8x8 RGBHV Matrix Switcher with RS232
- Ambilight Project Patch
- LED Wall Scrolling Text Patch
- Building my own LED-wall.
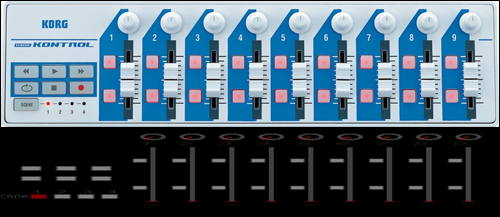
Korg Nano Kontrol MIDI mapper

Easy to use patch to easy map all the 4 scenes for the Korg Nano Kontrol MIDI controller. You move a slider, click on the simulation and your controller is mapped correctly. Also includes a few ways to split the data, a readme, and a lot of other stuff to read:
Korg Nano Kontrol MIDI mapper.
Old version: KorgNanoKontMIDIMapper.zip.
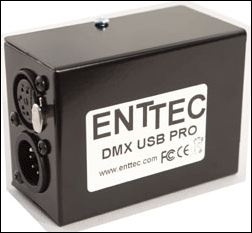
Enttec USB Pro DMX support.

I have patched a module that can send DMX using the Enttec USB Pro dongle. Be sure you set up your virtual comport first. Install the driver on the enttec website, and just to be sure, test it with the DMXUSBPro Utility, you than also see what COMport you want to use. I tested both patches with an Artistic Licence Micro-Scope 3a DMX test device.
DMX Sender: DMX (Devices Enttec_USB_Pro)
DMX Reciever: DMX (Devices Enttec USB Pro Reciever)
Sending and Recieving Text over Artnet
ArtNet is a protocol for sending DMX data over IP networks. The reason for sending text via ArtNet, rather than other methods like BOYGROUPING, is that ArtNet is just broadcasting his information. This means that any computer in the network can receive it, without setting any IP addresses. The great benefit is now that I can hook up any computer to the network and start receiving text, without any configuration. I can use many Subnet and Universe ID’s.
The disadvantage off ArtNet is that it is only 8 bit (256 values max) over 512 channels per Universe. I am only allowed to send out values. So, in order to send any information using vvvv I have to convert the text to a spread of values, then send it over, and on the receiving side I have to transform the spread back to a text string again.
Artnet Text Sender: Artnet Text Sender
Artnet Text Reciever: Artnet Text Reciever

Using A Kramer VP-8x8 8x8 RGBHV Matrix Switcher with RS232
For an installation I wanted to be able to control this Kramer 8x8 Matrix Switcher with VVVV. A video Matrix basically let's you connect 8 different inputs and 8 different outputs, both VGA in this case. You can now select, with ease, what input you want to show on which output screen or you can make combinations. Also, with one press of a button you can give every output the same input source. I used VGA so I didn't have to use a scanconverter.
The method I used to control the Kramer is based on a virtual COM port. The tool, the Lantronix Com Port Redirector, which comes with your Kramer CD (or you can [http://www.kramerelectronics.com/support/download.asp?f=37117|download it), will pretend you are connected the Kramer trough a COM port (RS232), while you are actually using the Ethernet connection. All the settings I made where done following the users manual, I did not alter anything on the Web Manager Page. If you can use the Kramer VP-8x8 using the K-router software, you know you installed it correct, and you can start using this patch. It is basically a copy off the front-end buttons, with some creativity one can make very cool things based on this patch, just imagine that you can move the different inputs, based on time, or even triggered by a beat!!
The Kramer VP-8x8 patch: Kramer8x8switcher.v4p
If you want to know why this Patch works, and learn a bit more about the RS232 (Devices) node, please, do read on.
This node is used to communicate with a device that is connected to a RS232 serial port. If you want to know more about RS232, you can read an introduction to RS232. The RS232 (Devices) node can receive and send information. All the information that is received or send will be in text strings.
If you want to use received strings in vvvv for example to change a parameter, the first thing you have to do is convert these text strings to decimal values you can work with. The most common way to do this is to convert these strings to ASCII code. This can be achieved by connecting the Ord (String) node to the output pin off the RS232 (Devices) node.
The method off controlling an RS232 device is a bit more complicated. The input pin off the RS232 (Devices) node only accepts text strings. Sometimes you could be lucky and just copy/paste the information from the output pin to an IOBox (String) connected to the input pin, set the 'do send' pin to 1 and it works. This method how ever does NOT work for the majority of the serial devices out there.
To save time, it is best to look for a manual, or find other people that already controlled your Serial device, so you know the code you need to send.
The trouble begins when you have text strings that contain characters that are NOT one off the 96 character ASCII codes that are representable characters. Meaning in short, if you need the keys you can't type with your keyboard. (any one ever seen the NULL key?)
The way around this is to look up the character you need in an ASCII code table, find the DECIMAL number that goes with the character, and convert this decimal with the SpellValue (String) node, set Mode pin to ASCII. You can connect the output pin directly to the input pin off the RS232 (Devices) node. If your device manual gives you hexadecimal code, you first need to translate this to a decimal number. You can either look it up on a table, calculate it yourself, or download, and use the patch that Kalle made, called HEX (String Value).v4p.
A small note on using the RS232 (Devices) node is that you can send more string in one go. How ever, you first have to put all the different strings into one bigger string, using the Add (String Spectral), and set the intersperse mode to 'none'.

Ambilight Project Patch
My first experience with vvvv came when I was looking for a way to make my lights react on video. Catweasel, wich I know from the VJ forum I am member off, pointed me out to vvvv, and even made me the basic patch.
I didn't had a name for the project, but a friend off mine was telling me I was trying to do the same thing as the Philips Ambilight television serie. So I kept that name.
We never realy installed this projects, but had some fun with watching a soccer match on the projector using Ambilight as a nice extra.
I used a filestream to get the video, but I can imagine you can patch it real easy for live video input. The Patch will take 5 pixels off every corner off the Video, calculates the mean and converts that to DMX. I used RGB LED lights, and they react the same way as the RGB (Color Join).

For the Club we are building, I rebuild the entire patch, I made it 'surround' (meaning just the 4 sides), add a damper, and most important, shades off grey and dark colors are not beeing used to calculate the main the color. It works great now.
The Ambilght patch: AmbilightREMAKE.v4p
Thanks Catweasel for all the help and introducing me to vvvv!!

LED Wall Scrolling Text Patch
For a massive LED wall we are going to build, using 25cm x 25cm blocks, 60 horizontal and 6 vertical (360 blocks!!), I wanted to be able to make an easy text scroller, and loads off other funny patches.
I made a 6x6 pixel font, and with the help off Sanch we created simple patches, and I was able to make a long string off words scroll.
The font I made is 6x6 pixels, and only contains the letters A-Z, the numbers 0-9 and a few special characters like ?!€. The '6x6letter maker' made it easy to add or change characters.
The trouble part was that a letter is 6x6 values, and the wall itself is just 360 values placed after eachother. So we had to make special complicated spreads, with loads off I (Spreads), Resample (Spreads), Add (Value) and Multiply (Value) nodes.
But now it works, and most inportant I LEARNED from it!! Now I can transform this scroller to DMX and make my LED Wall do a sweet texts croll!!
Text Scroll patch: 6x6 Scrolling Text.zip
Thanks sanch for the great help and teaching me how to create and work with complex spreads.
And remember: The faulty interface lies between the chair and the keyboard!!

Building my own LED-wall.
For a Dutch Club we are going to build a big wall, 15 metres long and 1.5 metre high, containing 360 blocks. Every block can be set to any RGB color we want.
We found some special, not expensive, RGB LED's we can use to make a VVVV controlled LED wall, The wall will be made with blocks (big pixels) that are 25 x 25 cm. Every block uses 3 DMX channels, and can be connected by a simple, standard cable.
The picture here is a demo we made for one pixel, and works great with VVVV. On te first picture you see the plexiglas that will cover the block. The second and third picture are some close ups, you see 2 off our special RGB LED devices.
The 4th picture is a close up off the connection between the cable and one RGB LED, The last picture shows the device that transforms the DMX to a voltage the RGB led understands.
We only used simple standard tools, so one block is very cheap, but a bit more labour is needed compared to 'ready to go' systems.
Yeh, it is a demo, that is why I used all that black Duck-Tape ;)
I am already working on the patches to controll the thing!! Basicly, every patch will have to result in a IOBox (color) that has 60 colums and 6 rows. That color spread can be translated to DMX and than to the wall. (WYSIWYG, what you see is what you get)
anonymous user login
Shoutbox
~1yr ago
~1yr ago
~1yr ago
~1yr ago
~1yr ago
~1yr ago
~1yr ago
~1yr ago
~1yr ago
~1yr ago

